# Lab 01 Util
官网上对实验难度的描述是easy , easy, moderate/hard, moderate, moderate。
我感觉是moderate, moderate, ??, hard, ???
可能和我看不懂他自带的教材有关系😢
开始实验前,建议阅读一下xv6系统的源码,看看定式是怎样的(至少要知道应该引入哪些头文件),强烈建议阅读 K&R C (深刻的认识到对C语言的理解完全不够,函数都认不全😔)
一定,一定,读完一章之后,再来做实验
# Sleep (easy)
让系统休息一会……
代码并不难,最难的地方应该在于,如果不阅读源码或求助的话,连头文件都不知道怎么include。
官网上有一些 Hints,虽然我感觉这一题的并没有什么用。
解题思路如下:
- 首先处理无参数的情况,异常退出。
- 调用库函数
sleep,参数为argv数组的第二个参数,使用atoi函数将字符串转为数值。
添加文件 user/sleep.c。
代码如下:
#include "kernel/types.h"
#include "kernel/stat.h"
#include "user/user.h"

int
main(int argc, char** argv) {
  if (argc < 2) {
    fprintf(2, "Usage:sleep seconds...\n");
    exit(1);
  }
  sleep(atoi(argv[1]));
  exit(0);
}
# PingPong(easy)
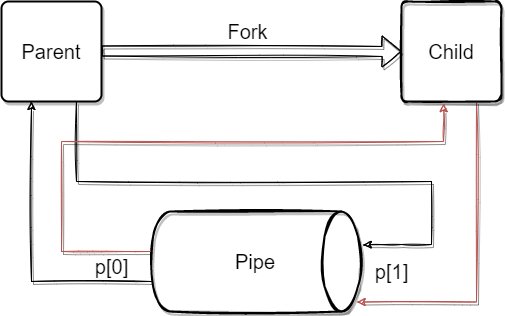
通过管道在子进程与父进程间传递信息,如下图所示:

不论对子进程还是父进程,管道都是单向通信,因此需要及时关闭管道的出入口,防止读写失败。
这里解题的思路如下:
- 首先,父进程通过管道向子进程写入信息,随后等待子进程的运行结束。
- 子进程开始运行,首先读入父进程传递的信息,随后打印子进程的
pid。 - 子进程通过管道向父进程写入信息后,结束子进程。
- 返回父进程,父进程读入子进程传递的信息,随后打印自己的
pid。 - 进程结束。
添加文件 user/pingpong.c
代码如下:
#include "kernel/types.h"
#include "kernel/stat.h"
#include "user/user.h"
/*
Write a program that uses UNIX system calls to ''ping-pong'' a byte between two processes over a pair of pipes, one for each direction.
The parent should send a byte to the child; the child should print "<pid>: received ping", where <pid> is its process ID, write the byte on the pipe to the parent, and exit;
the parent should read the byte from the child, print "<pid>: received pong", and exit. Your solution should be in the file user/pingpong.c.
*/


int
main(int argc, char** argv) {
  int p[2];
  pipe(p);
  if (fork() == 0) {//child to parent
    char buf[2];
    if (read(p[0], buf, 1) != 1) {
      fprintf(2, "Failed to read\n");
      exit(1);
    }
    close(p[0]);
    printf("%d: received ping\n", getpid());
    if (write(p[1], buf, 1) != 1) {
      fprintf(2, "Failed to write\n");
      exit(1);
    }
    close(p[1]);
    exit(0);
  }
  else {//parent to child
    char buf[2], info[2] = "g";
    if (write(p[1], info, 1) != 1) {
      fprintf(2, "Failed to write\n");
      exit(1);
    }
    close(p[1]);
    wait(0);

    if (read(p[0], buf, 1) != 1) {
      fprintf(2, "Failed to read\n");
      exit(1);
    }
    printf("%d: received pong\n", getpid());
    close(p[0]);
    exit(0);
  }
}
# Primes(moderate/hard)
一定记得去看Bell Labs and CSP Threads (swtch.com) 这个页面的详细描述。
本题旨在通过 fork 与 pipe 来实现一个流水线,进而实现一个并行化的素数筛。
为简洁描述,对此,不再使用父进程与子进程的概念,只使用出现的先后次序来描述。
解题思路为:
- 第一个进程将2到35传入第二个进程。
- 前一个进程传入的第一个数必然为质数(例如第一个到第二个,第一个数为2),于是,遍历后续的数字,将不能被此数字整除的数传递给下一个进程。
- 反复进行第二步操作,直到遍历完所有数字。
添加文件 user/primes.c
上述的操作,在描述上是迭代的进行,但实际上应当是递归式进行的,具体可见代码:
#include "kernel/types.h"
#include "kernel/stat.h"
#include "user/user.h"

/*
Write a concurrent version of prime sieve using pipes. This idea is due to Doug McIlroy, inventor of Unix pipes. The picture halfway down this page and the surrounding text explain how to do it. Your solution should be in the file user/primes.c.

Your goal is to use pipe and fork to set up the pipeline. The first process feeds the numbers 2 through 35 into the pipeline. For each prime number, you will arrange to create one process that reads from its left neighbor over a pipe and writes to its right neighbor over another pipe. Since xv6 has limited number of file descriptors and processes, the first process can stop at 35.
*/
__attribute__((noreturn))
void
right_neighbor(int p[]) {
  int prime, flag, n;
  close(p[1]);
  if (read(p[0], &prime, 4) != 4) {
    fprintf(2, "Error: read failed\n");
    exit(1);
  }
  printf("prime %d\n", prime);
  flag = read(p[0], &n, 4);
  if (flag) {
    int new_p[2];
    pipe(new_p);
    if (fork() == 0) {
      right_neighbor(new_p);
    }
    else {
      close(new_p[0]);
      if (n % prime)
        write(new_p[1], &n, 4);

      while (read(p[0], &n, 4)) {
        if (n % prime)
          write(new_p[1], &n, 4);
      }
      close(p[0]);
      close(new_p[1]);
      wait(0);
    }
  }
  exit(0);
}

int
main(int argc, char** argv) {
  int p[2];
  pipe(p);
  if (fork() == 0) {
    right_neighbor(p);
  }
  else {
    close(p[0]);
    for (int i = 2; i <= 35; i++) {
      if (write(p[1], &i, 4) != 4) {
        fprintf(2, "Error: write failed\n");
        exit(1);
      }
    }
    close(p[1]);
    wait(0);
  }
  exit(0);
}
# Find(moderate)
建议多看几遍官方的 Hint ,尤其是阅读 ls.c 的提示,会发现,其实这个代码跟 ls.c 的代码相差不大。
这里需要注意题中的两个要求:
- 递归寻找文件
- 不要递归进入"."/".."
添加文件 user/find.c
代码如下:
#include "kernel/types.h"
#include "kernel/stat.h"
#include "user/user.h"
#include "kernel/fs.h"

void
find(char const* path, char const* target) {
  char buf[512], * p;
  int fd;
  struct dirent de;
  struct stat st;
  if ((fd = open(path, 0)) < 0) {
    fprintf(2, "find: cannot open %s\n", path);
    exit(1);
  }

  if (fstat(fd, &st) < 0) {
    fprintf(2, "find: cannot stat %s\n", path);
    exit(1);
  }

  switch (st.type) {
  case T_FILE:
    fprintf(2, "Usage: find file...\n");
    exit(1);
  case T_DIR:
    if (strlen(path) + 1 + DIRSIZ + 1 > sizeof buf) {
      printf("find: path too long\n");
      break;
    }
    strcpy(buf, path);
    p = buf + strlen(buf);
    *p++ = '/';
    while (read(fd, &de, sizeof(de)) == sizeof(de)) {
      if (de.inum == 0 || strcmp(de.name, ".") == 0 || strcmp(de.name, "..") == 0)
        continue;
      memmove(p, de.name, DIRSIZ);
      p[DIRSIZ] = 0;
      if (stat(buf, &st) < 0) {
        printf("find: cannot stat %s\n", buf);
        continue;
      }
      if (st.type == T_DIR) {
        find(buf, target);
      }
      else if (st.type == T_FILE && strcmp(de.name, target) == 0)
        printf("%s\n", buf);
    }
    break;
  }
  close(fd);
}

int
main(int argc, char** argv) {
  if (argc < 2) {
    fprintf(2, "Usage: find files...\n");
    exit(1);
  }
  const char* path = argv[1];
  const char* target = argv[2];
  find(path, target);
  exit(0);
}
# xargs(moderate)
开始动手前,先查清楚 xargs 命令的作用是什么。
xargs 常与管道符号|一起使用,我们知道,管道的作用是将前一个命令的输出变为下一个命令的输入(一些粗糙的解释),但是管道存在一些无法完成的命令,这里使用 cat 命令来举例:
cat 命令可以接收文件名作为参数,执行后会显示出文件的内容。但是 cat 命令不能直接从标准输入接收参数:
# 这样是可以输出的
$ cat helloworld.txt
Hello  World!

# 这样是不行的
$ echo helloworld.txt | cat
helloworld.txt
这是因为:
- 管道可以实现:将前面的标准输出作为后面的“标准输入”
- 管道无法实现:将前面的标准输出作为后面的“命令参数”
因此需要使用 xargs 来讲前面的标准输出作为后面的命令参数而非标准输入,即,将标准输入作为其指定命令的参数。
$ echo helloworld.txt | xargs cat
Hello World!
添加文件 user/xargs.c
代码如下:
#include "kernel/types.h"
#include "kernel/stat.h"
#include "user/user.h"
#include "kernel/param.h"

int readline(char* new_argv[32], int curr_argc) {
  char buf[1024];
  int n = 0;
  while (read(0, buf + n, 1)) {
    if (n == 1023) {
      fprintf(2, "argument is too long\n");
      exit(1);
    }
    if (buf[n] == '\n') {
      break;
    }
    n++;
  }
  buf[n] = 0;
  if (n == 0)return 0;
  int offset = 0;
  while (offset < n) {
    new_argv[curr_argc++] = buf + offset;
    while (buf[offset] != ' ' && offset < n) {
      offset++;
    }
    while (buf[offset] == ' ' && offset < n) {
      buf[offset++] = 0;
    }
  }
  return curr_argc;
}

int main(int argc, char const* argv[]) {
  if (argc <= 1) {
    fprintf(2, "Usage: xargs command (arg ...)\n");
    exit(1);
  }
  char* command = malloc(strlen(argv[1]) + 1);
  char* new_argv[MAXARG];
  strcpy(command, argv[1]);
  for (int i = 1; i < argc; ++i) {
    new_argv[i - 1] = malloc(strlen(argv[i]) + 1);
    strcpy(new_argv[i - 1], argv[i]);
  }

  int curr_argc;
  while ((curr_argc = readline(new_argv, argc - 1)) != 0) {
    new_argv[curr_argc] = 0;
    if (fork() == 0) {
      exec(command, new_argv);
      fprintf(2, "exec failed\n");
      exit(1);
    }
    wait(0);
  }
  exit(0);
}
所有任务都完成后,记得在 Makefile 中添加 $U/_xxxx \$ ,xxxx为调用名称,也可以每写一个就添加一个,这样方便调试。
# 最终成绩
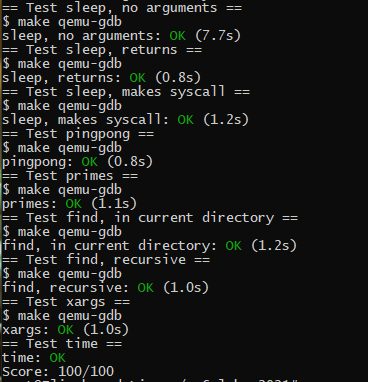
输入 make grade 来获得最终成绩。
(要添加一个 time.txt 文件才能拿满分,time.txt 内容只要一个整数,表示做完这个实验用了几个小时)

最后,输入
git add .
git commit -m "finish util"
不需要 push = =。
