# Lab06 Multithreading
一个模拟多线程的实验,应该算是比较简单的实验,可以仿照原有的实现来做。
实验难度为三个 moderate
# 实验准备
git fetch
git checkout thread
make clean
得到相应的实验环境
# Uthread: switching between threads
实验要求补全 uthread.c 与 uthread_switch.S 中的代码,完成一份用户层面的线程切换。
我们可以仿照 kernel/proc.c 中 sched() 与 kernel/swtch.S 的实现。
首先我们知道,调度不能缺少上下文,于是我们仿照 kernel/proc.h 中上下文的定义,并在 struct thread 中加入上下文:
struct thread_context {
  uint64 ra;
  uint64 sp;

  // callee-saved
  uint64 s0;
  uint64 s1;
  uint64 s2;
  uint64 s3;
  uint64 s4;
  uint64 s5;
  uint64 s6;
  uint64 s7;
  uint64 s8;
  uint64 s9;
  uint64 s10;
  uint64 s11;
};

struct thread {
  char       stack[STACK_SIZE]; /* the thread's stack */
  int        state;             /* FREE, RUNNING, RUNNABLE */
  struct thread_context context; /* the thread's context */
};
随后,我们想知道,用户级别的线程中我们如何获取 ra 与 sp (也就是返回地址与栈指针)
在 thread_create() 中,我们发现传递进来的是一个函数指针(也就是这个线程需要完成的工作),那么显然,我们应该把这个地址设置为我们的 ra ,并且我们发现,在 struct thread 的定义中有着 stack的定义,于是我们也能获取线程的栈指针了:
void
thread_create(void (*func)()) {
  struct thread* t;

  for (t = all_thread; t < all_thread + MAX_THREAD; t++) {
    if (t->state == FREE) break;
  }
  t->state = RUNNABLE;
  /* YOUR CODE HERE */
  t->context.ra = (uint64)func;
  t->context.sp = t->context.s0 = (uint64)&t->stack[STACK_SIZE - 1];
}
值得注意的是,这里的 s0 实际上就是 fp(frame pointer),与栈指针指向相同的地方,并且我们需要注意,栈是从高地址向低地址增长的,所以这里应该取数组最末尾的地址。
这样,我们就完成了上下文的创建,接下来就是上下文的切换了。我们仿照 kernel/swtch.S 中的实现:
	.text

	/*
         * save the old thread's registers,
         * restore the new thread's registers.
         */

	.globl thread_switch
thread_switch:
	/* YOUR CODE HERE */
    sd ra, 0(a0)
    sd sp, 8(a0)
    sd s0, 16(a0)
    sd s1, 24(a0)
    sd s2, 32(a0)
    sd s3, 40(a0)
    sd s4, 48(a0)
    sd s5, 56(a0)
    sd s6, 64(a0)
    sd s7, 72(a0)
    sd s8, 80(a0)
    sd s9, 88(a0)
    sd s10, 96(a0)
    sd s11, 104(a0)

    ld ra, 0(a1)
    ld sp, 8(a1)
    ld s0, 16(a1)
    ld s1, 24(a1)
    ld s2, 32(a1)
    ld s3, 40(a1)
    ld s4, 48(a1)
    ld s5, 56(a1)
    ld s6, 64(a1)
    ld s7, 72(a1)
    ld s8, 80(a1)
    ld s9, 88(a1)
    ld s10, 96(a1)
    ld s11, 104(a1)

	ret    /* return to ra */
在用户级代码中,我们在 thread_schedule() 中对两个线程进行切换:
if (current_thread != next_thread) { /* switch threads? */
next_thread->state = RUNNING;
t = current_thread;
current_thread = next_thread;
/* YOUR CODE HERE
* Invoke thread_switch to switch from t to next_thread:
* thread_switch(??, ??);
*/
thread_switch((uint64)&t, (uint64)¤t_thread);
}
这里注意两点:
t是需要让出CPU的线程,而current_thread或者说next_thread是需要被恢复运行的线程,根据我们在uthread_switch.S中的实现知道,第一个参数应该是需要保存上下文的线程,第二个是需要被恢复的线程。- 注意,我们需要切换的上下文,所以在这里我不能写成
thread_switch((uint64)t, (uint64)current_thread),这会导致系统出错(因为thread里面的ra什么的和我们定义的thread_context是不一样的……)
# Using threads
要求在真正的 Linux 或者 MacOS 上完成这个实验(WSL2完全可以胜任),因为要使用 pthread 这个库来进行一些多线程编程。
这里会答应一个问题,就是,为什么我们使用2个线程来完成哈希表的插入的时候,会出现一大堆的 missing 呢?虽然速度是有着显著的提升。
如果你仔细看 ph.c 中的 put() 与 insert() 的话,我的理解是:
多线程同时修改临界区的数据,可能会造成数据的丢失,例如两个线程如果都新插入一个条目的话,因为是异步的,所以可能会造成不同线程之间没有任何协同,导致前面刚插进去的东西,后一步就直接连到应该NULL上面去了,这样就会丢失很多数据,导致后面整个哈希表可能都是NULL
于是,他告诉我们,可以通过使用锁 (mutex) 来避免由于竞争带来的错误,并且我们的速度并不会受到很大的影响。
那么,我们首先在全局中声明:
pthread_mutex_t lock;
在 main() 中,我们在创建线程前初始化这个互斥锁:
  nthread = atoi(argv[1]);
  pthread_mutex_init(&lock, NULL);
随后,我们有两种做法(但实际上只有一种):
我们直接一劳永逸,在
put_thread()这个线程执行的函数中,我们在put前加锁,在完成put操作后解锁:static void* put_thread(void* xa) { int n = (int)(long)xa; // thread number int b = NKEYS / nthread; for (int i = 0; i < b; i++) { pthread_mutex_lock(&lock); put(keys[b * n + i], n); pthread_mutex_unlock(&lock); } return NULL; }这是一种很朴素的想法,事实上,这种操作下,我们在同一时间只允许一个线程进行
put操作,这当然不会出错,因为实际上这是一个串行的想法。但这种想法的结果是很糟糕的,因为我们为了不犯任何错误而抛弃了多线程的优势:速度快我们可以运行对比一下:
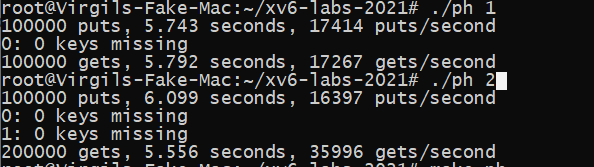
可以发现2个线程运行的居然会比1个线程运行的还慢,这显然是不行的。
我们结合上面问题的答案,大概能确定问题应该是出在
insert()这个函数上,所以我们只需要在put()中调用insert()的前后加锁即可:else { // the new is new. pthread_mutex_lock(&lock); insert(key, value, &table[i], table[i]); pthread_mutex_unlock(&lock); }这样,我们运行后对比为:
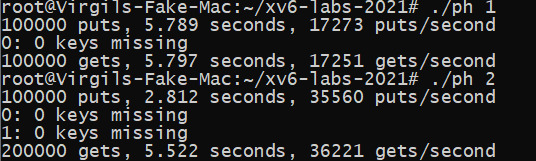
很完美
# Barrier
要求实现一个屏障点,也就是说,只有当所有线程都到达 barrier() 这个函数之后,线程才能够继续运行,提前到达的只能等着。
这个应该还是比较好实现的:
static void
barrier() {
  // YOUR CODE HERE
  //
  // Block until all threads have called barrier() and
  // then increment bstate.round.
  //
  pthread_mutex_lock(&bstate.barrier_mutex);
  bstate.nthread++;

  if (bstate.nthread == nthread) {
    bstate.nthread = 0;
    bstate.round++;
    pthread_cond_broadcast(&bstate.barrier_cond);
  }
  else {
    pthread_cond_wait(&bstate.barrier_cond, &bstate.barrier_mutex);
  }

  pthread_mutex_unlock(&bstate.barrier_mutex);
}
我们需要记录 bstate.nthread ,当它等于线程数时,我们就将其归零并且让所有线程继续运行,否则让这个线程等待。(记得记录一下 bstate.round )
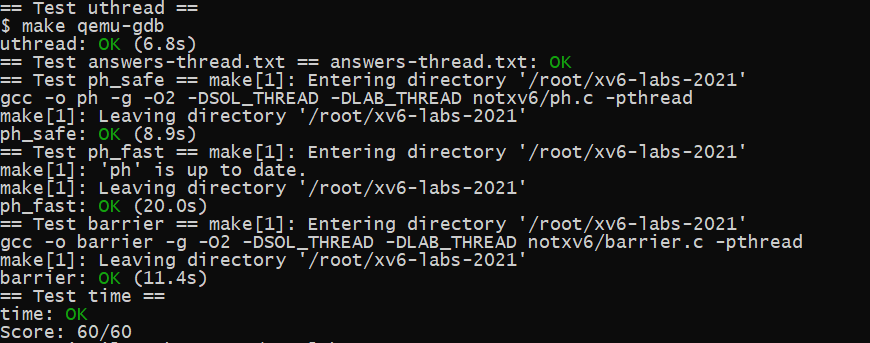
# 实验结果